Cubietruck Eerste stappen
07-03-2014 Cubieboard 3 - Cubietruck is binnen.
Mijn eerste stappen.
Eerlijk gejat en geplakt van:
http://docs.cubieboard.org/tutorials/ct1/installation/cb3_lubuntu-12.10-desktop_nand_installation_v1.00
Voor het laden van firmware/os op de cubietruck, moet je software
installeren op je PC. Daarna kun je met deze software de flash vullen,
om daar vanaf te booten.
Alternatief is een sd kaartje beschrijven.
Installeren software op pc
Om de cubietruck te laten booten is het handig er een os (operating system) op te zetten. In mijn geval Lubuntu Server.
Hiervoor moet je op je notebook software installeren:
Phoenixsuite voor onder windows
Livesuit voor Linux
Hier te downloaden:
http://docs.cubieboard.org/tutorials/common/livesuit_installation_guide
Even downloaden en uitpakken
root@haley:/home/gej/CloudStation/cubietruck/Livesuit#
root@haley:/home/gej/CloudStation/cubietruck/Livesuit# unzip LiveSuitV305_For_Linux64.zip
Archive: LiveSuitV305_For_Linux64.zip
...
root@haley:/home/gej/CloudStation/cubietruck/Livesuit# cd LiveSuit_For_Linux64/
Executable maken
root@haley:/home/gej/CloudStation/cubietruck/Livesuit/LiveSuit_For_Linux64# chmod a+x LiveSuit.run
root@haley:/home/gej/CloudStation/cubietruck/Livesuit/LiveSuit_For_Linux64# ./LiveSuit.run
Erachterkomen dat we extra software nodig hebben:
root@haley:/home/gej/CloudStation/cubietruck/Livesuit/LiveSuit_For_Linux64# apt-get install awdev-dkms dkms
...
Nog een keer installeren:
root@haley:/home/gej/CloudStation/cubietruck/Livesuit/LiveSuit_For_Linux64# ./LiveSuit.run
Laden os/firmware
En dan draaien
root@haley:/home/gej/CloudStation/cubietruck/Livesuit/LiveSuit_For_Linux64# cd /root/Bin/LiveSuit/
root@haley:~/Bin/LiveSuit# ls
bin LiveSuit.sh
root@haley:~/Bin/LiveSuit# ./LiveSuit.sh
You are running on Ubuntu

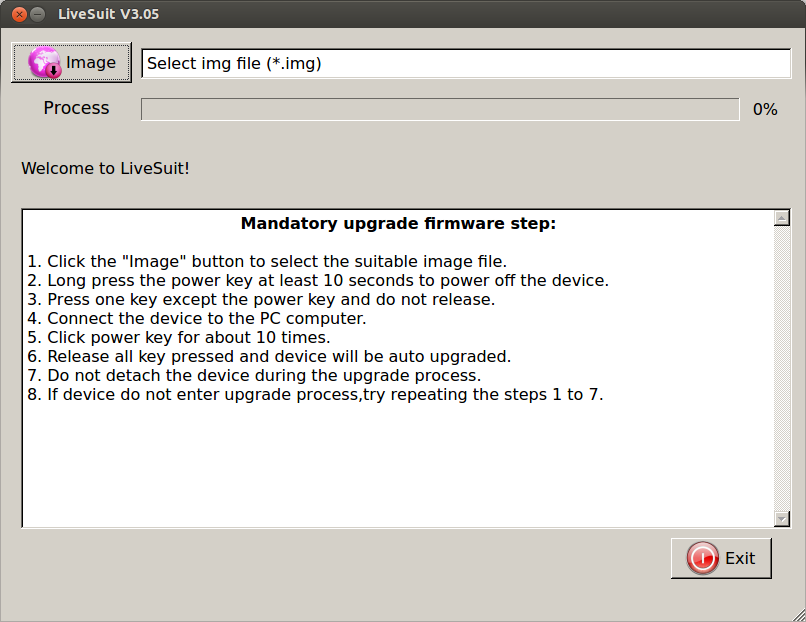
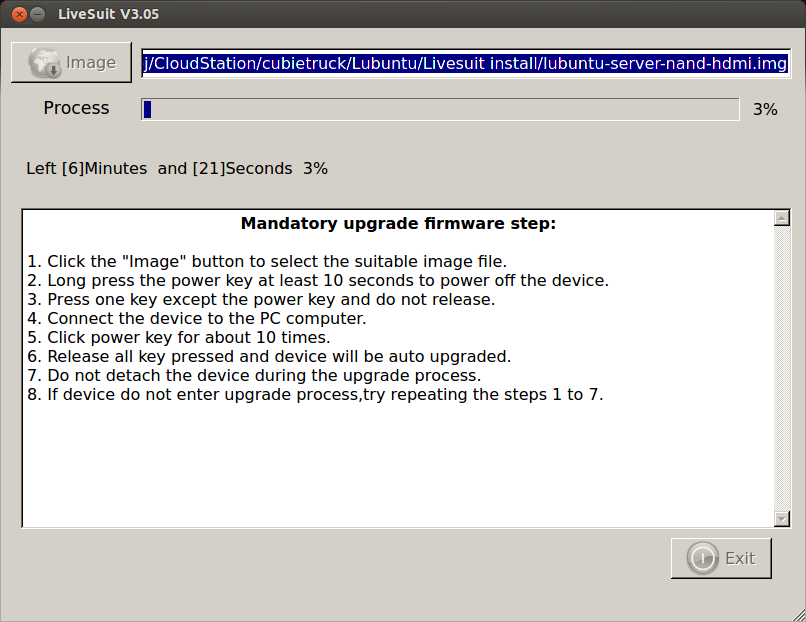
Bij Image moet je dan een image kiezen. Deze moeten we nog even downloaden:
http://dl.cubieboard.org/software/a20-cubietruck/lubuntu/ct-lubuntu-nand-v1.02/
In mijn geval, Lubuntu server 1.02
lubuntu-server-nand-hdmi.img.gz
Dit is een Lubuntu 13.08 versie. Die je achteraf nog mag upgraden.
Na het downloaden nog even uitpakken
root@haley:/home/gej/CloudStation/cubietruck/Lubuntu/Livesuit install# gunzip lubuntu-server-nand-hdmi.img.gz
root@haley:/home/gej/CloudStation/cubietruck/Lubuntu/Livesuit install# ls -l
total 805544
-rw-r--r-- 1 gej gej 824869888 Mar 7 21:08 lubuntu-server-nand-hdmi.img
root@haley:/home/gej/CloudStation/cubietruck/Lubuntu/Livesuit install#
Hier staat dan de uitgepakte image voor LiveSuit
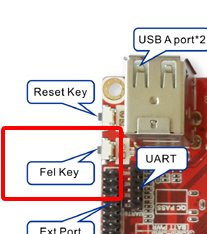
Sluit nu de Cubietruck niet aan de stroom, maar druk de "Fel" key in en hang hem dan aan de pc via de mini usb
kabel.

Als de software aangeeft dat hij wil gaan formateren kun je de
"Fel" button loslaten, dit bevestigen en de image op de nand zetten.

Hij krijgt nu de voeding van de PC.
En dan na het flashen even weer op de stroom aansluiten en booten. (als
je niet snel genoeg bent, boot hij gewoon met de stroom via die usb
connector.
En dan inloggen:
ssh 192.168.1.194 -l linaro
Booten
De Cubietruck boot eerst van de sd kaart, daarna van nand (internal flash).
Ik had eerst een sd kaart gemaakt om daar van te booten, maar de truck
mopperde dat het een 3.3V sd kaart moest zijn, en die had ik net niet
over.
Dus toch maar even de nand opnieuw beschreven met Lubuntu.
Technisch:
- On-chip first stage booloader looks for SPL from block 8 of SD card,
then if not present does the same from NAND. If not found either, enters
FEL mode.
- SPL (2nd stage bootloader) then loads u-boot from block 40 (recent u-boot-sunxi-with-spl.bin images already contain both).
-
u-boot finds the boot partition, loads script.bin to configure the
hardware, loads uEnv.txt to see what parameters to give to pass to the
kernel including the root partition location, and finally loads said
kernel (uImage). So these 3 files are all that's needed on the SD card's
boot partition.
mac adres vast zetten
De Cubietruck heeft na elke boot een nieuw mac adres. Daardoor krijgt hij na elke boot een nieuw IP adres. Da's onhandig.....
Volgens de ct van april 2014 moet je die even vastzetten:
linaro@cubietruck:~$ sudo -i
root@cubietruck:~# cd /etc/modprobe.d/
root@cubietruck:/etc/modprobe.d# vi cubietruck.conf
options sunxi_gmac mac_str="02:4e:02:83:21:49"
De bedoeling is dan wel dat je zelf iets verzint. Dus een getal aanpast of een letter. (hoogste letter is in hex f)
os truukjes
visudo
eigen user aanmaken
Tijdzone
root@cubietruck:~# tzselect
Please identify a location so that time zone rules can be set correctly.
Please select a continent or ocean.
1) Africa
2) Americas
3) Antarctica
4) Arctic Ocean
5) Asia
6) Atlantic Ocean
7) Australia
8) Europe
9) Indian Ocean
10) Pacific Ocean
11) none - I want to specify the time zone using the Posix TZ format.
#? 8
Please select a country.
1) Aaland Islands 18) Greece 35) Norway
2)
Albania 19)
Guernsey 36)
Poland
3)
Andorra 20)
Hungary 37)
Portugal
4)
Austria 21)
Ireland 38)
Romania
5) Belarus 22) Isle of Man 39) Russia
6)
Belgium 23)
Italy 40) San
Marino
7) Bosnia & Herzegovina 24) Jersey 41) Serbia
8) Britain (UK) 25) Latvia 42) Slovakia
9)
Bulgaria 26)
Liechtenstein 43) Slovenia
10) Croatia
27) Lithuania
44) Spain
11) Czech Republic 28) Luxembourg 45) Sweden
12) Denmark
29) Macedonia
46) Switzerland
13) Estonia
30) Malta
47) Turkey
14) Finland
31) Moldova
48) Ukraine
15) France
32) Monaco
49) Vatican City
16) Germany 33) Montenegro
17) Gibraltar 34) Netherlands
#? 34
The following information has been given:
Netherlands
Therefore TZ='Europe/Amsterdam' will be used.
Local time is now: Sun Mar 9 21:18:47 CET 2014.
Universal Time is now: Sun Mar 9 20:18:47 UTC 2014.
Is the above information OK?
1) Yes
2) No
#? 1
You can make this change permanent for yourself by appending the line
TZ='Europe/Amsterdam'; export TZ
to the file '.profile' in your home directory; then log out and log in again.
Here is that TZ value again, this time on standard output so that you
can use the /usr/bin/tzselect command in shell scripts:
Europe/Amsterdam
root@cubietruck:~#
update
apt-get update
apt-get upgrade
Na inloggen zie je dat er een nieuwe versie klaar staat. Alleen met een do-release-upgrade krijg je een foutmelding.
Als je het pakket aptitude installeerd, en je reboot daarna, dan krijg je geen foutmelding meer bij de nieuwe do-release-upgrade
dus:
root@cubietruck:~# apt-get install aptitude
root@cubietruck:~# reboot
root@cubietruck:~#
do-release-upgrade
ntp installeren
Bij versie 1.02 zit ntp niet bij. Toch is dat wel handig, dus even installeren.
gej@cubietruck:~$ sudo apt-get install aptitude
Reading package lists... Done
Building dependency tree
Reading state information... Done
...
gej@cubietruck:~$ sudo aptitude search ntp
p
chntpw
- NT SAM password recovery
utility
p
cyrus-nntpd
- Cyrus mail system - NNTP support
(metapackage)
p
cyrus-nntpd-2.2
- Transitional package for
cyrus-nntpd-2.4
v
cyrus-nntpd-2.3
-
p
cyrus-nntpd-2.4
- Cyrus mail system - NNTP
support
p
gir1.2-accountplugin-1.0
- typelib file for
libaccount-plugin-1.0-0
p
libnet-ntp-perl
- Perl module to query NTP
servers
p
libnews-nntpclient-perl
- Perl module to access NNTP
servers
p
libwsman-clientpp-dev
- Open Web Services Manager C++ bindings development
files
p
libwsman-clientpp1
- Open Web Services Manager C++
bindings
p
mountpy
- script for quick mounting of removable
devices
p
ntp
- Network Time Protocol daemon and utility
programs
p
ntp-doc
- Network Time Protocol
documentation
i
ntpdate
- client for setting system time from NTP
servers
p
openntpd
- OpenBSD NTP
daemon
p
php-net-nntp
- PHP Pear module for
NNTP
p
python-zope.contentprovider
- Content Provider Framework for Zope
Templates
p
sinntp
- tiny non-interactive NNTP
client
p
zentyal-ntp
- Zentyal - NTP
Service
gej@cubietruck:~$
gej@cubietruck:~$ sudo apt-get install ntp
Reading package lists... Done
Building dependency tree
...
gej@cubietruck:~$
webserver met php installeren
Installatie van apache met php5
root@cubietruck:~# apt-get install php5 apache2
Reading package lists... Done
Building dependency tree
Reading state information... Done
apache2 is already the newest version.
The following NEW packages will be installed:
php5
0 upgraded, 1 newly installed, 0 to remove and 0 not upgraded.
Need to get 1254 B of archives.
After this operation, 29.7 kB of additional disk space will be used.
Do you want to continue [Y/n]? y
WARNING: The following packages cannot be authenticated!
php5
Authentication warning overridden.
Get:1 http://ports.ubuntu.com/ubuntu-ports/ saucy/main php5 all 5.5.3+dfsg-1ubuntu2 [1254 B]
Fetched 1254 B in 0s (8647 B/s)
Selecting previously unselected package php5.
(Reading database ... 23517 files and directories currently installed.)
Unpacking php5 (from .../php5_5.5.3+dfsg-1ubuntu2_all.deb) ...
Setting up php5 (5.5.3+dfsg-1ubuntu2) ...
root@cubietruck:~#
Even een zelfportret plaatsen:
root@cubietruck:~# cd /var/www/
root@cubietruck:/var/www# ls
index.html
root@cubietruck:/var/www# vi index.html
root@cubietruck:/var/www#
wireless
modprobe -v bcmdhd
apt-get install wireless-tools
iwconfig
iwlist wlan0 scan
apt-get install wpasupplicant
i2c bus (oftewel de twi, two wire interface)
Quote:
The Cubietruck makes use of the first three i2c controllers found on the
Allwinner A10; i2c-0 is used internally for the PMIC, i2c-1 is exposed on
the board headers, and i2c-2 is used for DDC on the VGA connector. This
patch enables them in the device tree.
Dus we zoeken i2c-1 bus. De andere zijn al bezet.
De "firmware" om te booten staat in /dev/nanda, deze moet je even
mounten. De binary leesbaar maken, editen en weer terugplaatsen met de
juiste stetings.
Mounten /dev/nanda
root@cubietruck:~# mount /dev/nanda /mnt
Kopieren van de firmware naar een bewerkbare plek.
root@cubietruck:~# cp /mnt/script.bin .
Leesbaar maken
root@cubietruck:~# bin2fex script.bin > script.fex
fexc-bin: script.bin: version: 0.1.2
fexc-bin: script.bin: size: 46496 (83 sections)
root@cubietruck:~#
Editen
(in mijn gevan, i2c bus 1 aanzetten)
root@cubietruck:~# vi script.fex
..
[twi1_para]
twi1_used = 1
twi1_scl = port:PB18<2><default><default><default>
twi1_sda = port:PB19<2><default><default><default>
...
Firmware weer binary maken
root@cubietruck:~# fex2bin script.fex script.bin
root@cubietruck:~#
Kopieren naar de juite plek
root@cubietruck:~# cp script.bin /mnt/script.bin
En weer unmounten
root@cubietruck:~# umount /mnt
Na een reboot doet de i2c interface het dan, met de clock op PB18 en de SDA op PB19
Bij mij is er dan iets aangesloten op adres 77.
root@cubietruck:~# i2cdetect -y 1
0 1 2 3 4
5 6 7 8 9 a b c d
e f
00: -- -- -- -- -- -- -- -- -- -- -- -- --
10: -- -- -- -- -- -- -- -- -- -- -- -- -- -- -- --
20: -- -- -- -- -- -- -- -- -- -- -- -- -- -- -- --
30: -- -- -- -- -- -- -- -- -- -- -- -- -- -- -- --
40: -- -- -- -- -- -- -- -- -- -- -- -- -- -- -- --
50: -- -- -- -- -- -- -- -- -- -- -- -- -- -- -- --
60: -- -- -- -- -- -- -- -- -- -- -- -- -- -- -- --
70:
-- -- -- -- -- -- --
77
root@cubietruck:~#
SPI
gejat van het forum en nog te controleren:
Hi,
I'm writing this post because I resolved the mess (helped by a lot of other posts).
I'm using ct_lubuntu_desktop_v1.02 on my cubietruck.
At first I modified script.bin read other posts how to create script.fex to modify.
[spi2_para]
spi_used = 1
spi_cs_bitmap = 1
spi_cs0 = port:PC19<3><default><default><default>
spi_cs1 = port:PB13<2><default><default><default>
spi_sclk = port:PC20<3><default><default><default>
spi_mosi = port:PC21<3><default><default><default>
spi_miso = port:PC22<3><default><default><default>
[spi_devices]
spi_dev_num = 1
[spi_board0]
modalias = "spidev"
max_speed_hz = 12000000
bus_num = 2
chip_select = 0
mode = 3
full_duplex = 1
manual_cs = 0
Now if you:
modprobe spi-sun7i
dmesg show you that spi is working and /dev/spidev2.0 created
It is working full duplex.
If you want test it you should use spidev_test.c
Install the corrects libraries to compile it but at first you should modify a file:
reading here:
https://groups.google.com/forum/#!msg/linux-sunxi/yEmBiaJ3LAI/aD6HGPE3soEJ
I discovered that /usr/include/linux/spi/spidev.h
should be changed adding in the right position
__u16 interbyte_usecs
like so:
struct spi_ioc_transfer {
__u64 tx_buf;
__u64 rx_buf;
__u32 len;
__u32 speed_hz;
__u16 interbyte_usecs;
__u16 delay_usecs;
__u8 bits_per_word;
__u8 cs_change;
__u32 pad;
Now compiling and executing spidev_test.c
You can see:
root@cubietruck:~/# ./spidev_test -D /dev/spidev2.0
spi mode: 0
bits per word: 8
max speed: 500000 Hz (500 KHz)
00 00 00 00 00 00
00 00 00 00 00 00
00 00 00 00 00 00
00 00 00 00 00 00
00 00 00 00 00 00
00 00 00 00 00 00
00 00
And if you connect miso with mosi you can see:
root@cubietruck:~# ./spidev_test
spi mode: 0
bits per word: 8
max speed: 500000 Hz (500 KHz)
FF FF FF FF FF FF
40 00 00 00 00 95
FF FF FF FF FF FF
FF FF FF FF FF FF
FF FF FF FF FF FF
DE AD BE EF BA AD
F0 0D
I'm sorry for my English but my first language is Italian.
I hope this can help you.
"try at your own risk" "I am not responsible if you, anyone, or anythings get hurt or damaged".
Francesco Fichera
referenties
http://docs.cubieboard.org/tutorials/ct1/installation/cb3_lubuntu-12.10-desktop_nand_installation_v1.00


